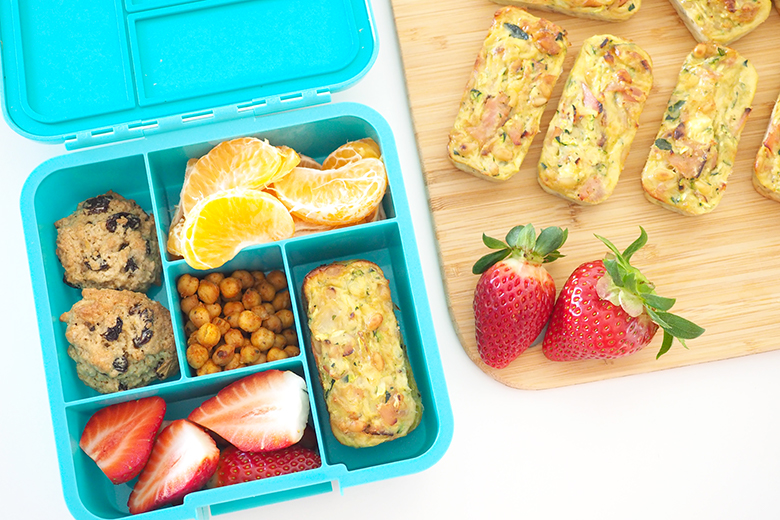
Perfect for school and work lunches, this Thermomix Zucchini and Vegetable Slice is freezer-friendly and easily prepared in a Thermomix.
When it comes to packing school or work lunches, there are times when you crave something different from the usual sandwich. Having something in the freezer that’s easy to grab and go is always a bonus.
This Zucchini and Vegetable Slice is perfect for both work and school lunches and even makes an easy dinner when paired with a salad.
Don’t have a Thermomix? I’ve created this recipe in two ways, and here’s the Thermomix version for your convenience and you’ll find my regular recipe here.
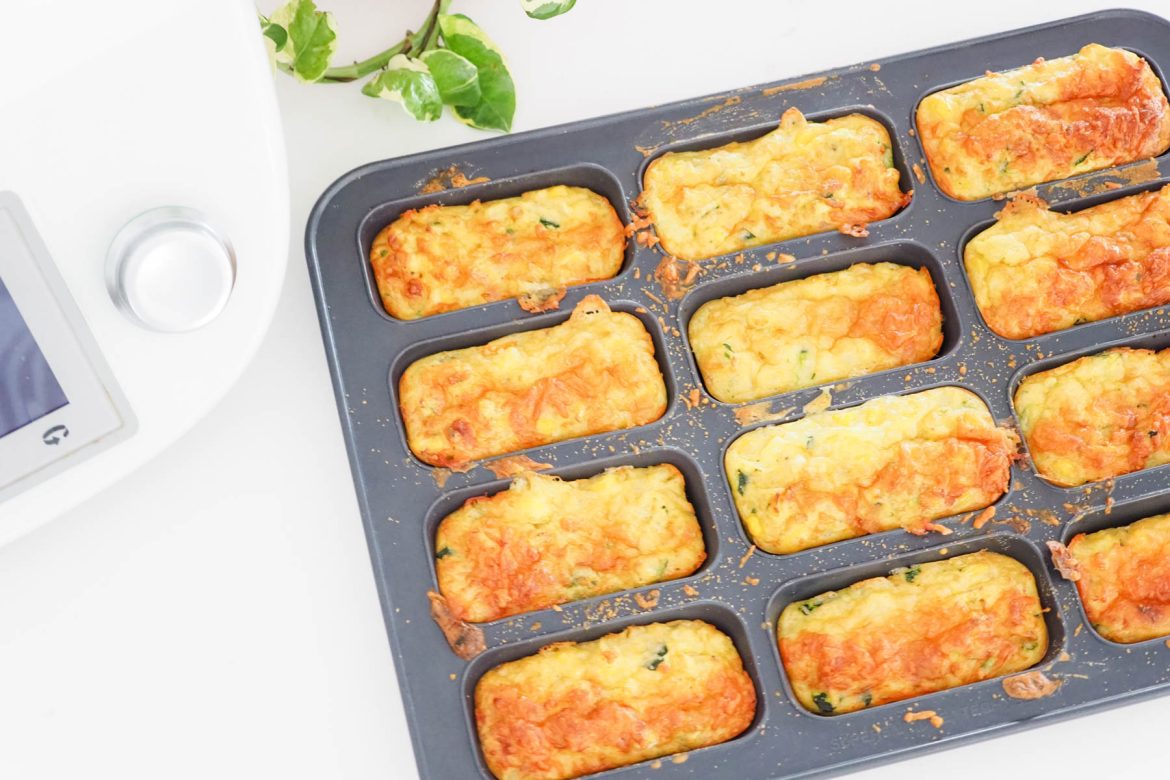
Once cooked, cut into individual portions and freeze into a freezer safe container. Although, I prepared my Zucchini and Vegetable Slice using mysilicone mini loaf pan, creating perfectly sized individual portions that are ideal for lunch. You will need two baking trays, as this mixture makes 24 mini loaves.
Kat’s tip: When baking the loaves in a mini silicone loaf pan, they can sometimes turn out a bit soggy due to the moisture from the zucchini. To remedy this, after cooking, let them cool for 5 minutes (which helps prevent breakage). Then, gently remove the loaves from the pan, place them on a baking tray, and return them to the oven for an additional 5 minutes. This extra step will help crisp up the sides slightly, providing a better texture.
Preheat oven to 160°C. Line a 30×20 lamington pan with baking paper or use two silicone mini loaf pans.
Add tasty cheese to TM bowl and chop for 8 sec/speed 8. Set aside.
Add parmesan cheese to TM bowl and chop for 8 sec/speed 8. Set aside.
Add onion, carrot and bacon to TM bowl and chop for 3 sec/speed 4. Scrape the side of the bowl and repeat.
Add zucchini and chop for a further 3 sec/speed 4. Scrape the side of the bowl and repeat.
Add corn, flour, oil, eggs, salt & pepper and reserved tasty cheese to TM bowl and stir for 5 sec/counter-clockwise/speed 4 until just combined. Scrape the side of the bowl and repeat.
Pour the mix into prepared tin, sprinkle with parmesen cheese.
Cook for 35-45 minutes until firm and golden brown.
Allow to cool for 5 minutes before removing from pan.
Notes
When baking the loaves in a mini silicone loaf pan, they can sometimes turn out a bit soggy due to the moisture from the zucchini. To remedy this, after cooking, let them cool for 5 minutes (which helps prevent breakage). Then, gently remove the loaves from the pan, place them on a baking tray, and return them to the oven for an additional 5 minutes. This extra step will help crisp up the sides slightly, providing a better texture.
Prep Time:15 min
Cook Time:45 mins
FROM MY SHOP
We offer a huge variety of hand-selected organisation, storage, cleaning, kitchenwares, homewares and more all to help make life easier at home, all delivered to your door.
Katrina Springer, affectionately known as The Organised Housewife, advocates for a harmonious home and balanced living. With expertise in home organising, cleaning, meal planning and managing family life, Kat's mission is to inspire and support her community with practical tips empowering her readers to reclaim control of their homes.
My mission is to inspire and empower others to achieve a sense of order and balance in their homes, enabling them to easily tackle daily tasks so then the rest of the day is filled with activities that bring them joy.
As a popular blogger, influencer, and author, I draw from my expertise in home organisation, cleaning, and meal planning to offer practical tips and heartfelt encouragement to my audience.